


Table of Content
- Purpose & Goals
- Scope & Applicability
- Roles & Responsibilities
- Prerequisites / Required Resources
- Detailed Procedure / Steps
- Step 1: Initial Crawl & Foundational Accessibility Checks
- Step 2: Server & Technical Configuration Checks
- Step 3: Google Search Console Analysis
- Step 4: Security Checks
- Step 5: Deeper On-Page & Content Element Checks
- Step 6: Mobile Responsiveness & Usability Testing
- Step 7: Advanced Technical SEO Checks
- Step 8: Analytics & Development Environment Verification
- Step 9: Website Speed and Performance Audit
- Quality Assurance & Verification
- Error and Exception Handling
- Supporting Documents / References
- External Web References
Purpose & Goals
This Standard Operating Procedure (SOP) outlines the step-by-step process for conducting a comprehensive Technical SEO Audit. The primary goal of this SOP is to ensure a consistent, thorough, and effective approach to identifying and documenting technical SEO issues on a website. By following this SOP, Technical SEO Specialists will be able to:
- Systematically crawl and analyze websites.
- Identify critical technical SEO issues that may hinder search engine visibility and website performance.
- Document findings in a clear and organized manner for reporting and remediation.
- Ensure adherence to technical SEO best practices throughout the audit process.
Scope & Applicability
This SOP applies to all Technical SEO Specialists within the SEO Department responsible for performing Technical SEO Audits. It covers the entire process of identifying technical SEO issues, from initial website crawl to the verification of analytics setup and development environment.
Roles & Responsibilities
- Role 1: Department Manager
- Responsibilities:
- Oversees the Technical SEO Audit process and ensures adherence to this SOP.
- Manages team workload and resource allocation for audits.
- Reviews and approves final audit reports before delivery.
- Handles escalations and exceptions related to the audit process.
- Responsibilities:
- Role 2: Technical SEO Specialists
- Responsibilities:
- Executes the Technical SEO Audit according to this SOP.
- Utilizes Screaming Frog and other necessary tools to gather data and identify technical SEO issues.
- Analyzes audit findings and develops actionable recommendations.
- Documents all findings and recommendations in a clear and structured audit report.
- Communicates progress and any issues to the Department Manager.
- Responsibilities:
Prerequisites / Required Resources
To effectively perform a Technical SEO Audit according to this SOP, the following prerequisites and resources are required:
Software & Tools:
- Screaming Frog SEO Spider: https://www.screamingfrog.co.uk/seo-spider/ (Licensed version recommended for larger websites). User Guide: https://www.screamingfrog.co.uk/seo-spider/user-guide/
- Google Search Console (GSC) Access: Access to the website’s Google Search Console property with appropriate permissions.
- Google PageSpeed Insights: https://pagespeed.web.dev/
- GTmetrix: https://gtmetrix.com/
- WebPageTest: https://www.webpagetest.org/
- DNS Checker: https://dnschecker.org/all-dns-records-of-domain.php
- CDN Finder by CDNPlanet: https://www.cdnplanet.com/tools/cdnfinder
- SSL Checker by Ultahost: https://ultahost.com/ssl-checker
- Google Mobile-Friendly Test: https://search.google.com/test/mobile-friendly
- Google Rich Results Test: https://search.google.com/test/rich-results
- Schema Markup Validator: https://validator.schema.org/
- Google Tag Assistant (Chrome Extension): Search in Chrome Web Store
- Browser Developer Tools: (Built-in to Chrome, Firefox, Safari, Edge – accessed by right-clicking on a webpage and selecting “Inspect” or “Inspect Element”)
- Sucuri SiteCheck: https://sitecheck.sucuri.net/
- VirusTotal: https://www.virustotal.com/
Access & Permissions:
- Administrative or Read-Only access to Google Search Console for the website.
- Potentially require access to server configuration files (.htaccess, etc.) – coordinate with the development team if needed.
- Potentially require access to website analytics platform (Google Analytics) – coordinate with the analytics team if needed.
- Access to a staging environment (if available) – coordinate with the development team if needed.
Detailed Procedure / Steps
Step 1: Initial Crawl & Foundational Accessibility Checks
1.1 Website Crawl
Screaming Frog SEO Spider is a powerful website crawler used to analyze websites from an SEO perspective. This step utilizes Screaming Frog to gather a comprehensive list of URLs and initial data points for the website. For detailed information on using Screaming Frog, refer to the official user guide: https://www.screamingfrog.co.uk/seo-spider/user-guide/
Here is a step-by-step guide to perform a basic crawl:
- Launch Screaming Frog SEO Spider application on your desktop.
- In the “Enter URL to spider” bar, input the website’s homepage URL you wish to audit.
- Configure crawl settings if necessary (for most basic audits, default settings are sufficient).
- Click the “Start” button to initiate the website crawl.
- Allow the crawler to explore the website fully until it has crawled all accessible URLs.
- Once completed, export the crawl data for analysis by navigating to File > Export > Crawl Data and saving it in CSV or Excel format.
a. Tool: Launch Screaming Frog SEO Spider. b. Action: Enter the website’s homepage URL into the “Enter URL to spider” bar. c. Action: Configure Screaming Frog settings as needed for the website (e.g., crawl limits, included/excluded URLs, user-agent if specified). d. Action: Start the crawl by clicking “Start”. e. Action: Allow the crawl to complete fully, ensuring all accessible pages are crawled. f. Action: Once the crawl is complete, export the crawl data in a CSV or Excel format for detailed analysis (File > Export > Crawl Data). g. Analysis of Crawl Data: Review the Screaming Frog data to identify the following issues:
- Response Codes (404, 500, 301, 302):
- Filter: In Screaming Frog, navigate to the “Response Codes” tab and analyze “Client Error (4xx)” and “Server Error (5xx)” for broken pages, and “Redirection (3xx)” for redirects.
- Issue: Identify URLs returning 404, 500 errors (broken pages), and excessive or incorrect redirects (301, 302).
- Broken Internal/External Links:
- Filter: In Screaming Frog, navigate to the “Links” tab and filter by “Status Code” to identify 4xx and 5xx errors for both internal and external links.
- Issue: List broken internal and external links that need to be fixed or updated.
- URL Parameters and Duplicates:
- Filter: In Screaming Frog, analyze the “URL” column and look for URLs with parameters (e.g., ?, &, =). Check for similar content served on different parameter URLs.
- Issue: Identify unnecessary URL parameters that may be creating duplicate content issues.
- Best Practice: Investigate if canonical tags are properly implemented to address parameter variations.
- Orphaned Pages:
- Method: Compare the list of crawled URLs from Screaming Frog with the website’s XML Sitemap (identified in Step 1.3). Pages in the sitemap but not found in the crawl could be orphaned. However, a more accurate method is to use Sitebulb or other advanced crawlers with orphaned page analysis.
- Issue: Identify pages that are not linked to from anywhere else on the website (if possible with available tooling, otherwise flag for potential further investigation).
- Page Load Speed per URL (Initial):
- Column: Screaming Frog provides a “Download Time” column. Sort by this column to identify potentially slow-loading pages based on download time from the crawl.
- Issue: Flag potentially slow-loading URLs for deeper investigation with dedicated speed testing tools in Step 2.1.
- Title Tags (Missing, Duplicate, Length):
- Tab: In Screaming Frog, navigate to the “Page Titles” tab.
- Issue: Identify missing title tags (“Missing” filter), duplicate title tags (“Duplicate” filter), and title tags exceeding recommended length (analyze character count column – aim for under 60 characters generally).
- Meta Descriptions (Missing, Duplicate, Length):
- Tab: In Screaming Frog, navigate to the “Meta Descriptions” tab.
- Issue: Identify missing meta descriptions (“Missing” filter), duplicate meta descriptions (“Duplicate” filter), and meta descriptions exceeding recommended length (analyze character count column – aim for under 160 characters generally).
- H1-H6 Hierarchy and Duplicates:
- Tab: In Screaming Frog, navigate to the “H1” and “H2” (and subsequent heading) tabs.
- Issue: Analyze the content of H1s and H2s for relevance and duplication. Check for missing H1s. Review the hierarchy (H1 should ideally be unique and represent the main topic).
- Best Practice: Ensure a logical heading structure (H1, H2, H3, etc.) is used to structure content.
- Word Count per Page:
- Column: Screaming Frog provides a “Word Count” column.
- Issue: Identify pages with very low word counts, which may indicate thin content. Consider context – some pages like contact forms are naturally short.
- Image Optimization Needs (Initial):
- Tab: In Screaming Frog, navigate to the “Images” tab.
- Column: Review the “Size” column for image file sizes.
- Issue: Flag images with very large file sizes for further optimization in Step 5.1.
- Canonical Tags Implementation (Initial Check):
- Tab: In Screaming Frog, navigate to the “Canonical” tab.
- Issue: Check for missing canonical tags (“Missing” filter). Note URLs where canonical tags are not implemented.
- Best Practice: Ensure canonical tags are used correctly, especially for paginated pages, duplicate content, and parameter URLs.
- Noindex/Nofollow Directives (Initial Check):
- Tab: In Screaming Frog, navigate to the “Directives” tab.
- Issue: Identify pages with “NOINDEX” or “NOFOLLOW” directives. Verify if these directives are intentional and correctly implemented.
- Meta Robots Tags (Initial Check):
- Method: Review the “Meta Robots 1” and “Meta Robots 2” columns in Screaming Frog crawl data (under “Directives” tab).
- Issue: Identify pages with specific meta robots tags (beyond noindex/nofollow) and verify their intended purpose.
- Hreflang Implementation (Initial Check):
- Tab: In Screaming Frog, navigate to the “Hreflang” tab.
- Issue: Check if hreflang tags are present on multilingual/multiregional websites. Note if any errors are reported by Screaming Frog. Deeper analysis in Step 5.1.
- Pagination Implementation (Initial Check):
- Method: Analyze URLs and page content for pagination patterns (e.g., /page/2/, ?p=2). Check for rel=”next” and rel=”prev” in the HTML source code of paginated pages (can be checked via “HTML” tab in Screaming Frog for individual pages).
- Issue: Identify potential pagination issues and flag for detailed verification of rel=”next” and rel=”prev” implementation in Step 5.1.
1.2 robots.txt Setup
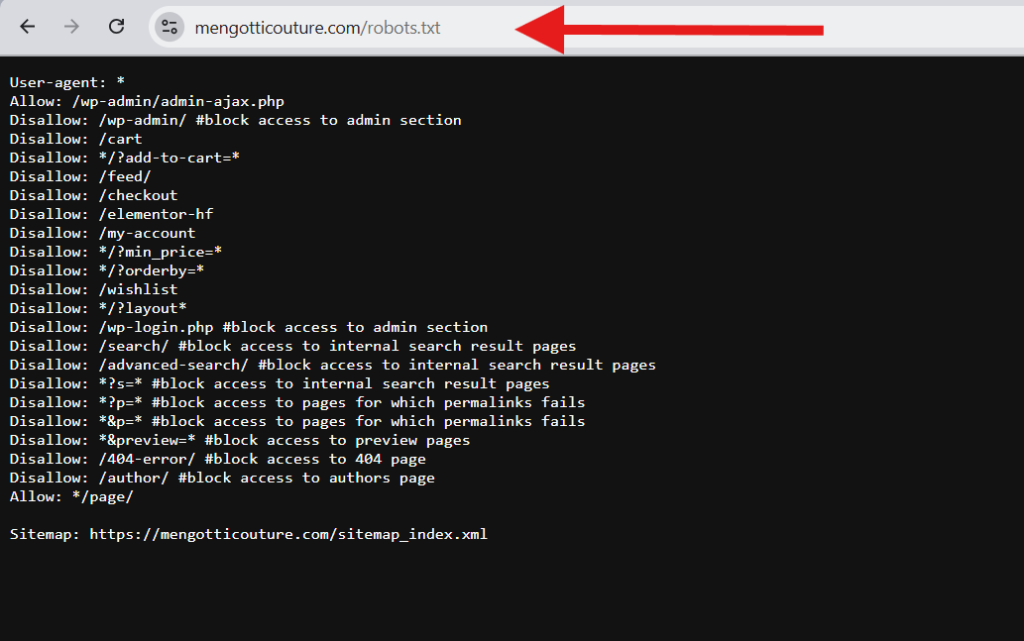
a. Method 1: Browser Access
- Action: Open a web browser and navigate to [website domain]/robots.txt (e.g., example.com/robots.txt).
- Action: Review the content of the robots.txt file.
- Issue: Identify incorrect syntax, accidental disallow directives for important sections of the website (e.g., /wp-admin/ is acceptable, disallowing / or key content sections is not), or blocking of essential resources (CSS, JavaScript files – though generally best practice to allow them).
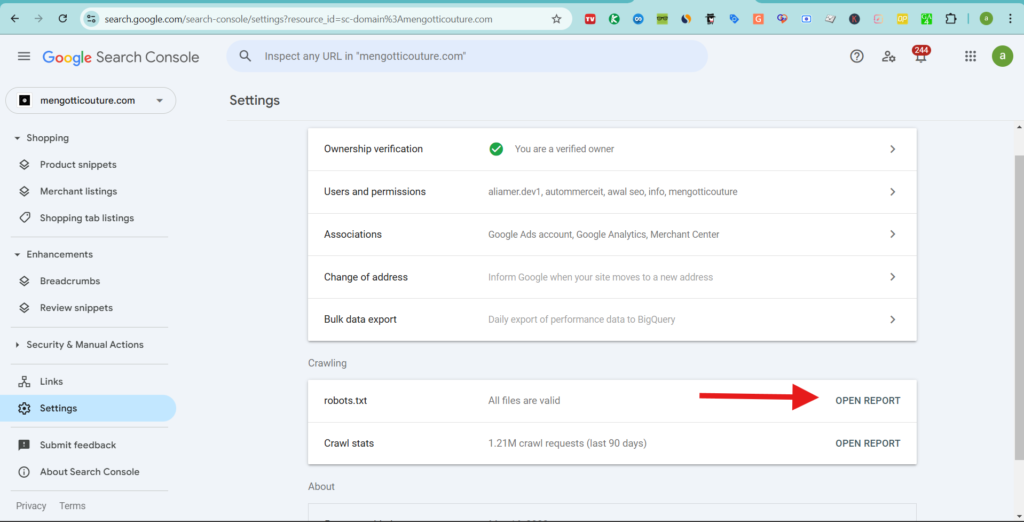
b. Method 2: Google Search Console Robots.txt Tester
- Tool: Google Search Console > Setting > Robots.txt Report.
- Action: Access the Robots.txt Report in GSC.
- Action: Review the current robots.txt file as displayed in GSC.
- Action: Test specific URLs using the tester to see if they are allowed or disallowed by the current robots.txt rules.
- Issue: Identify URLs that are unintentionally blocked by robots.txt directives, especially important content pages or resource files.
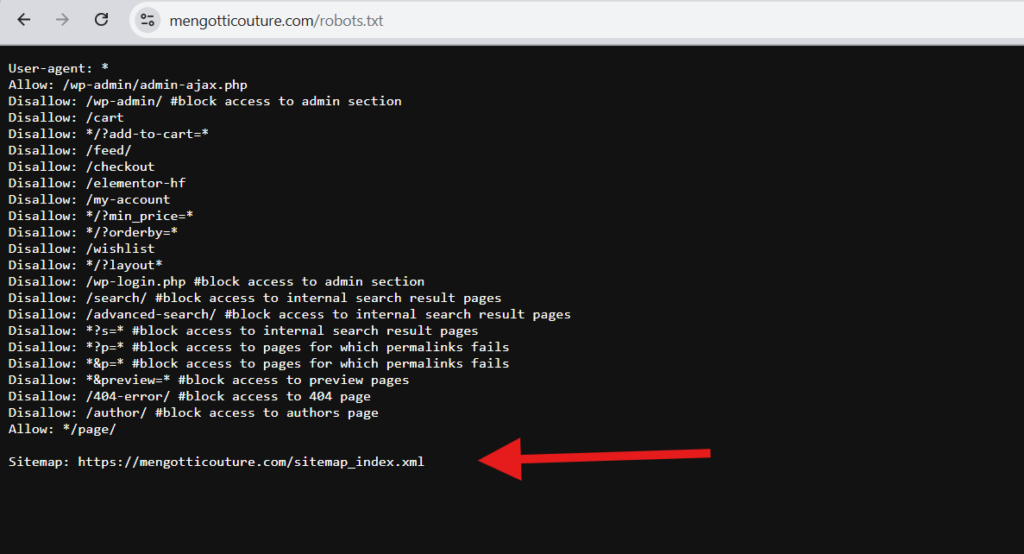
1.3 XML Sitemap Errors
a. Method 1: Sitemap Location Check
- Action: Check robots.txt file (from Step 1.2) for a Sitemap: directive. If present, note the sitemap URL.
- Action: If no sitemap directive in robots.txt, try common sitemap locations like [website domain]/sitemap.xml or [website domain]/sitemap_index.xml.
- Action: Access the identified sitemap URL(s) in a web browser.
- Issue: If no sitemap is found, or if the sitemap displays an XML error, document the issue.
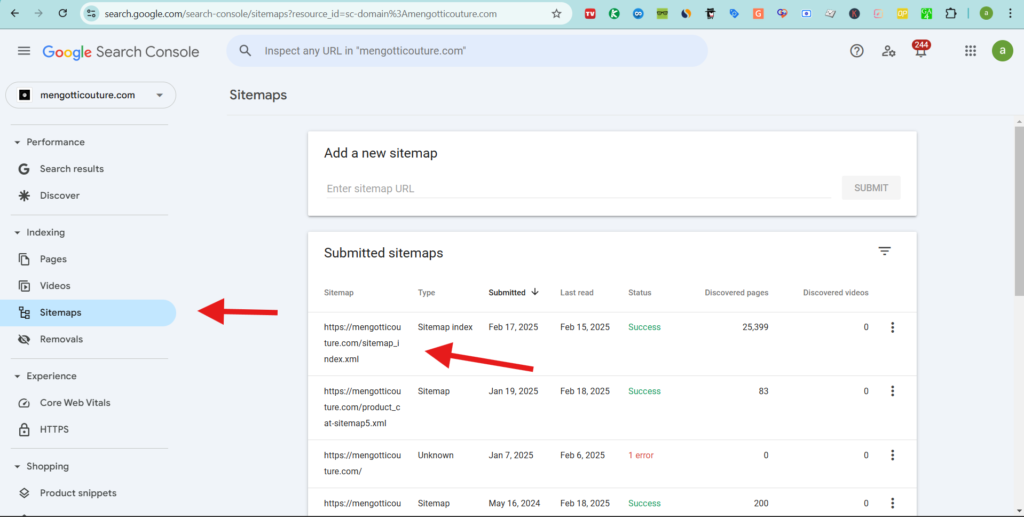
b. Method 2: Google Search Console Sitemaps Report
- Tool: Google Search Console > Index > Sitemaps.
- Action: Access the Sitemaps report in GSC.
- Action: Check the status of submitted sitemaps. Look for “Error” statuses or warnings.
- Action: If a sitemap was successfully submitted, review the “Coverage” details to see if there are any issues reported by Google (e.g., “URLs not in Sitemap”).
- Issue: Identify sitemap submission errors, invalid XML format, warnings from GSC, or discrepancies between the sitemap and actual website URLs.
- Best Practice: Ensure the sitemap is valid XML, contains only indexable URLs, and is submitted to Google Search Console.
1.4 WWW vs. non-WWW Redirection Check:
Method 1: Browser Test
Action:
- Open a web browser.
- Type in the non-WWW version of the website URL (e.g., http://yourdomain.com) and observe if it automatically redirects to the WWW version (http://www.yourdomain.com or https://www.yourdomain.com).
- Then, type in the WWW version (http://www.yourdomain.com) and check if it redirects to the non-WWW version (http://yourdomain.com or https://yourdomain.com).
- Repeat the test using https:// for both WWW and non-WWW versions (e.g., https://yourdomain.com and https://www.yourdomain.com).
Method 2: Command Line (using curl or ping) – For more technical verification.
Action:
- Open a command line terminal (e.g., Terminal on Mac/Linux, Command Prompt on Windows).
- Use curl -I yourdomain.com and examine the headers for redirect status codes (301 or 302) and the “Location” header.
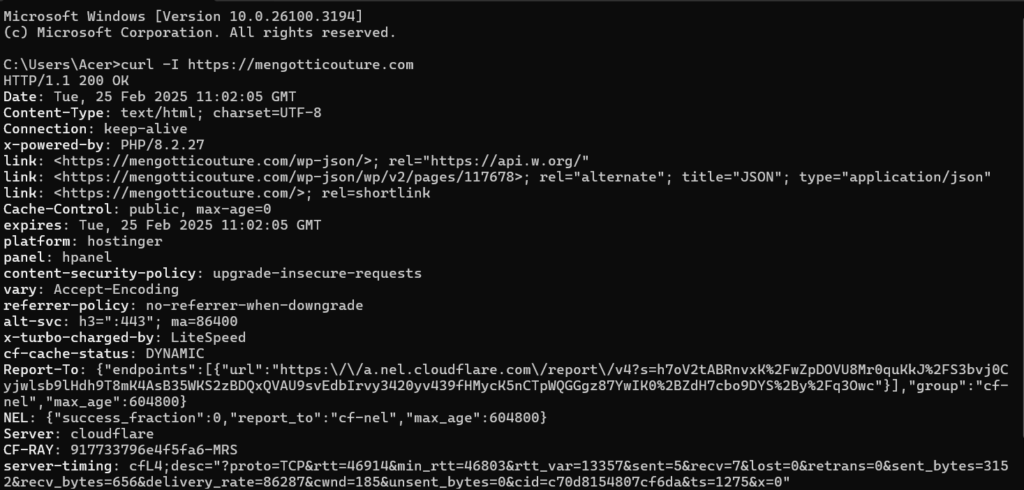
- Use curl -I www.yourdomain.com and do the same. Or use ping yourdomain.com and ping www.yourdomain.com to see if both resolve to the same IP or different IPs (though redirect is the key aspect).
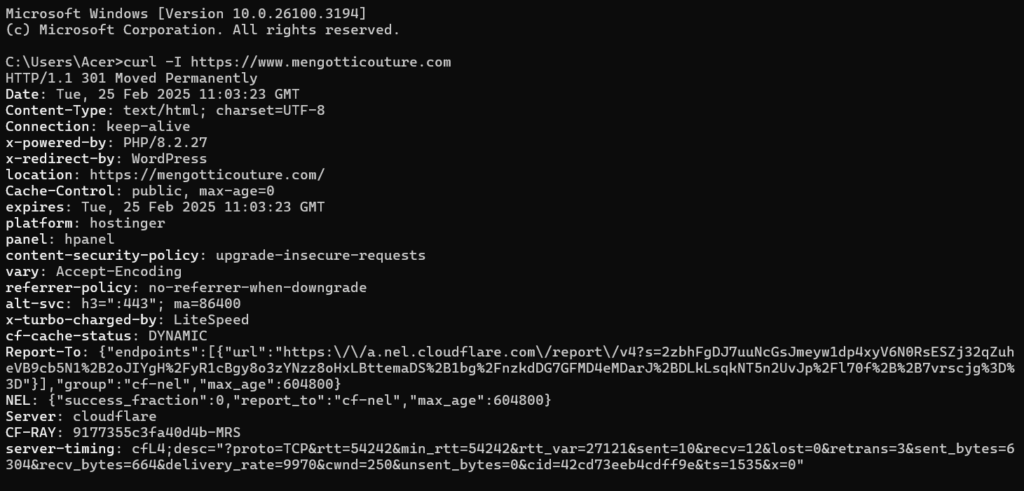
Goal: Determine if the website correctly handles WWW vs. non-WWW by redirecting to a single preferred version (either WWW or non-WWW).
Issues to Identify:
- No Redirect from non-WWW to WWW (or vice versa): If accessing both yourdomain.com and www.yourdomain.com leads to separate, live websites (especially serving the same or very similar content) without a 301 permanent redirect to a single version. This is a critical duplicate content issue.
- No Redirect to HTTPS for both WWW and non-WWW: If either WWW or non-WWW versions, when accessed via http://, do not redirect to https:// version.
- Incorrect Redirect Type (e.g., 302 instead of 301): If a redirect exists, but it’s a 302 temporary redirect instead of the SEO-best-practice 301 permanent redirect for canonicalization.
- Redirect Loops: In rare cases, incorrect configuration can cause redirect loops between WWW and non-WWW; browser tests should reveal these.
Step 2: Server & Technical Configuration Checks
2.1 Server Configuration
a. Server Response Time:
- Tool 1: Google PageSpeed Insights (https://pagespeed.web.dev/)
- Action: Enter the website’s homepage URL into PageSpeed Insights and analyze the “Performance” section, specifically the “Server response time” metric (part of First Byte Time).
- Issue: Identify if the server response time is consistently slow (aim for under 0.2 seconds ideally, but under 0.6 seconds is acceptable in many cases).
- Tool 2: GTmetrix (https://gtmetrix.com/)
- Action: Enter the website’s homepage URL into GTmetrix and analyze the “Waterfall” tab. Look at the “TTFB” (Time To First Byte) for the initial document request.
- Issue: Corroborate findings from PageSpeed Insights regarding server response time.
b. Server Location:
- Tool: DNS Checker (https://dnschecker.org/all-dns-records-of-domain.php)
- Action: Enter the website’s domain name into DNS Checker.
- Action: Look up the “A” records. The IP address listed will often correspond to the server’s location.
- Tool: IP Lookup Websites (ipinfo.io, whatismyipaddress.com)
- Action: Take the IP address from DNS Checker and use an IP lookup website to determine the geographical location of the server.
- Issue: Identify if the server location is geographically distant from the website’s primary target audience. This can impact website speed for users in the target region.
c. DNS Configuration:
- Tool: DNS Checker (https://dnschecker.org/all-dns-records-of-domain.php)
- Action: Enter the website’s domain name into DNS Checker and run a “Check DNS Records”.
- Action: Verify the following DNS records are correctly configured:
- A Records: Pointing to the correct server IP address(es).
- CNAME Records: Properly configured for subdomains (e.g., www, cdn).
- MX Records: Correct for email delivery (less relevant for technical SEO but good to note).
- Issue: Identify incorrect or missing DNS records that could cause website accessibility issues, email delivery problems, or subdomain misconfigurations.
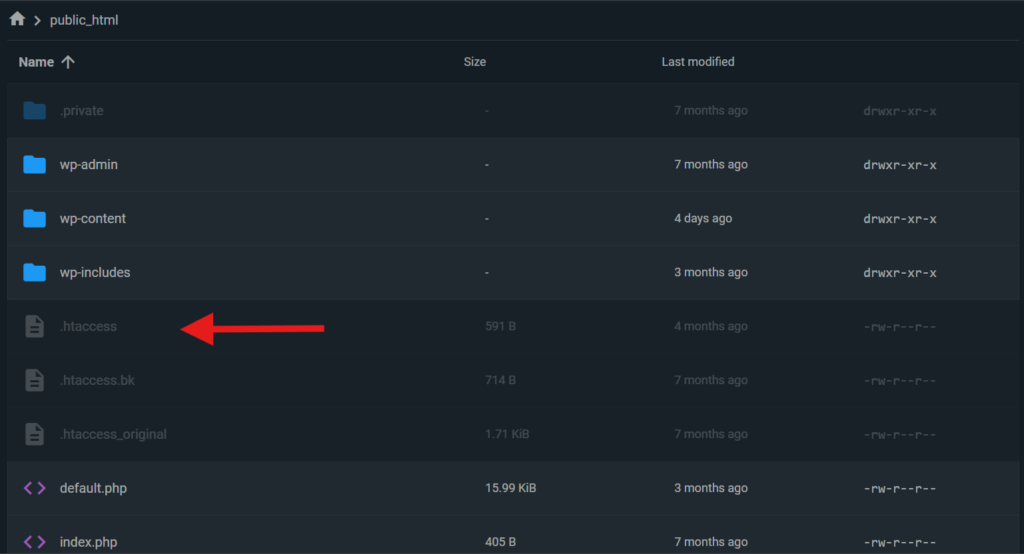
d. .htaccess Configuration (or Server Config):
- Method: Requires server access or coordination with the development/hosting team.
- Action: Request access to the .htaccess file (for Apache servers) or equivalent server configuration files (for Nginx, etc.).
- Action: Review the configuration file for:
- Redirect Rules: Check for correct redirect syntax, avoid redirect loops, ensure proper use of 301 redirects for permanent moves and 302 for temporary moves where intended.
- Security Headers: Look for implementation of security headers like:
- Content-Security-Policy
- X-Frame-Options
- X-XSS-Protection
- Strict-Transport-Security (HSTS)
- Referrer-Policy
- Caching Directives: Verify proper caching rules are set up (e.g., Cache-Control, Expires).
- Gzip/Brotli Compression: Check if compression is enabled.
- Issue: Identify incorrect redirect rules, missing or misconfigured security headers, improper or missing caching directives, lack of compression.
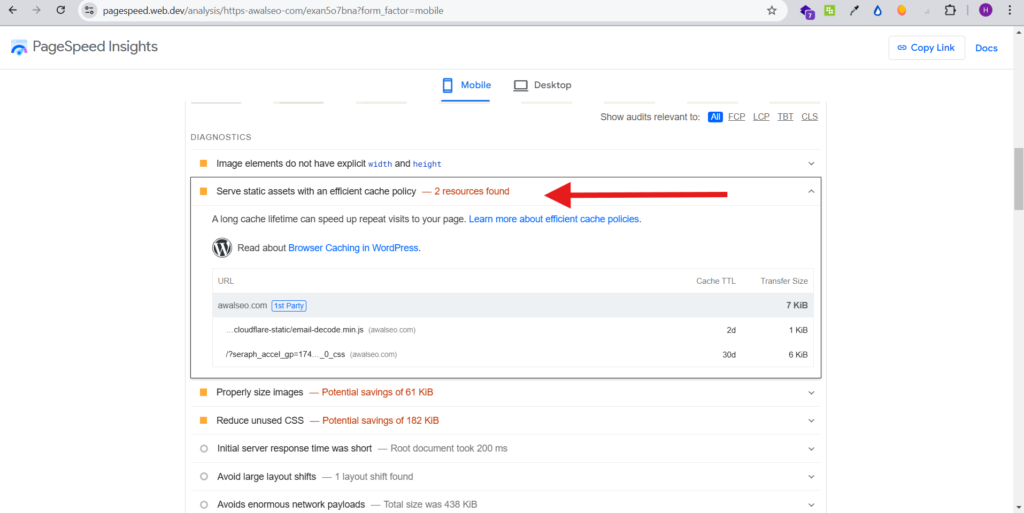
e. Browser Caching:
- Google PageSpeed Insights (https://pagespeed.web.dev/)
- Action: Analyze the “Opportunities” section in PageSpeed Insights for recommendations related to “Serve static assets with an efficient cache policy”.
- Issue: Identify if static assets (images, CSS, JavaScript) are not leveraging browser caching effectively.
f. CDN Implementation:
- Use CDN Finder by CDNPlanet (https://www.cdnplanet.com/tools/cdnfinder)
- Action: Enter the website’s domain name into CDN Finder.
- Action: Run the CDN check.
- Issue: Identify if a CDN is detected. If a CDN is expected but not detected, or if an unexpected CDN is found, document the issue.
Step 3: Google Search Console Analysis
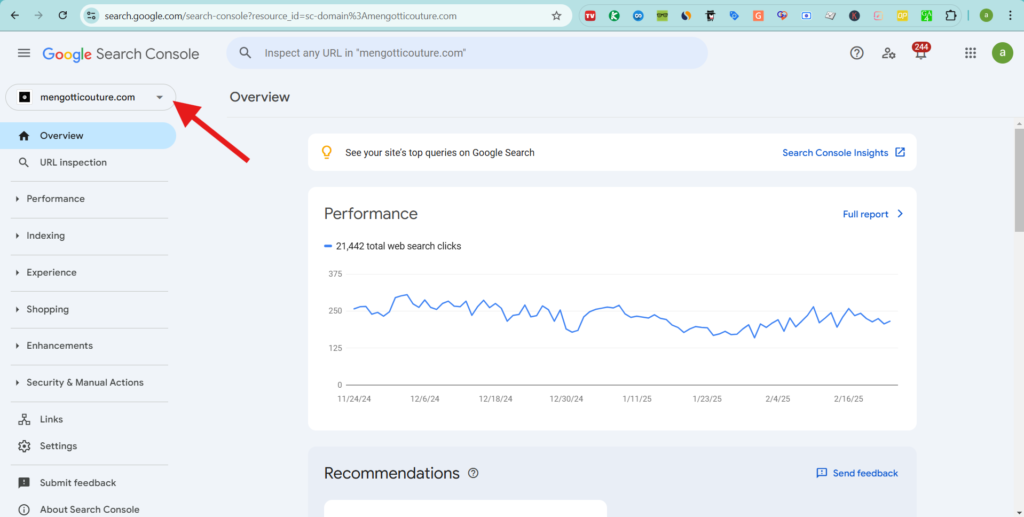
3.1 Google Search Console Analysis
a. Tool: Google Search Console (https://search.google.com/search-console/) b. Action: Log in to Google Search Console and select the website property.
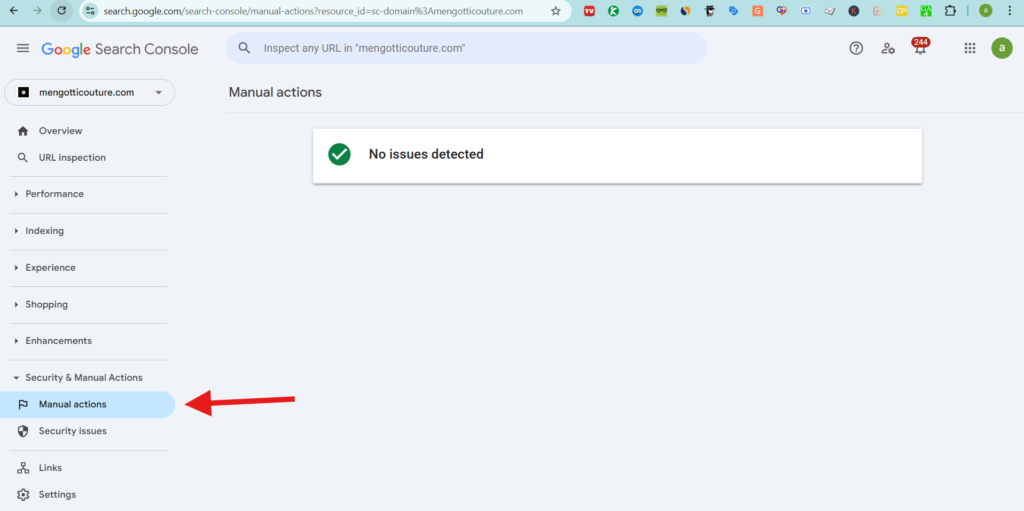
- Manual Actions:
- Navigate: Google Search Console > Security & Manual Actions > Manual actions.
- Issue: Check for any manual actions reported by Google. Manual actions indicate penalties and require immediate attention and remediation.
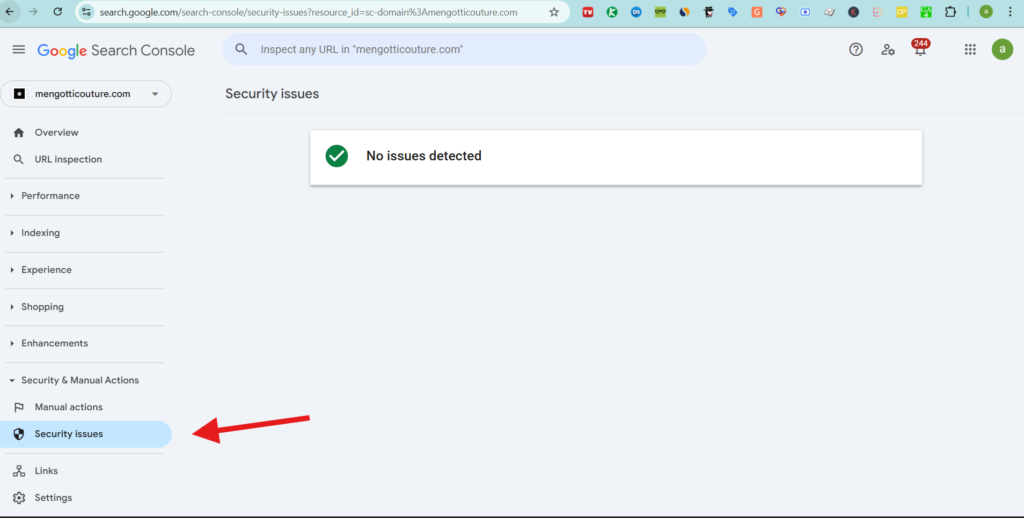
- Security Issues:
- Navigate: Google Search Console > Security & Manual Actions > Security issues.
- Issue: Check for any security issues reported by Google (e.g., malware, hacked content). Security issues are critical and require immediate investigation and resolution.
- Mobile Usability:
- Navigate: Google Search Console > Experience > Core Web Vitals < Mobile Usability.
- Issue: Review the Mobile Usability report for errors and warnings. Identify specific mobile usability issues reported by Google (e.g., content wider than screen, text too small to read, touch elements too close).

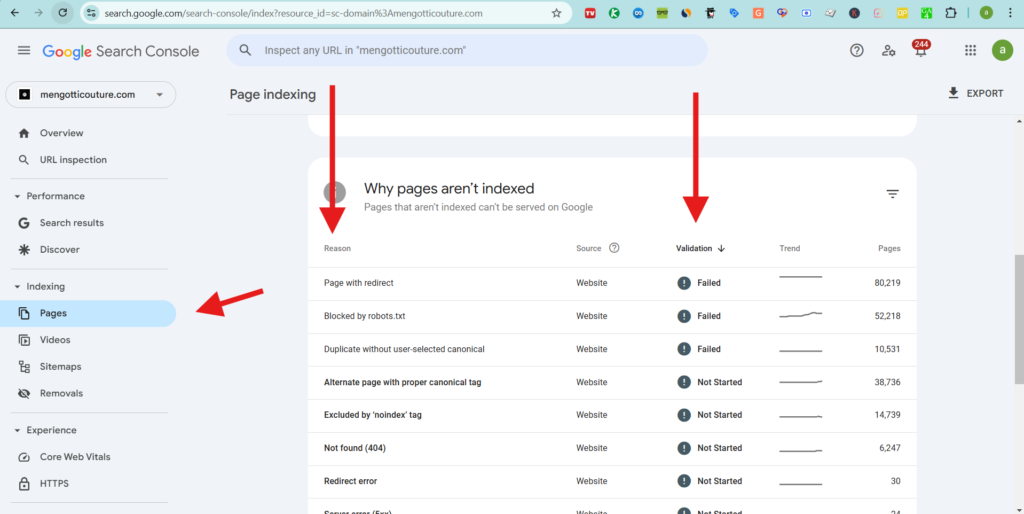
- Index Coverage:
- Navigate: Google Search Console > Index > Coverage.
- Issue: Analyze the “Error” and “Excluded” tabs.
- “Error” pages: Identify indexing errors that prevent pages from being indexed (e.g., 404 errors submitted in sitemap, server errors).
- “Excluded” pages: Review the reasons for excluded pages. Understand if exclusion is intentional (e.g., paginated pages, thank you pages) or unintentional (e.g., “Discovered – currently not indexed,” “Crawled – currently not indexed” may indicate crawl budget or quality issues).
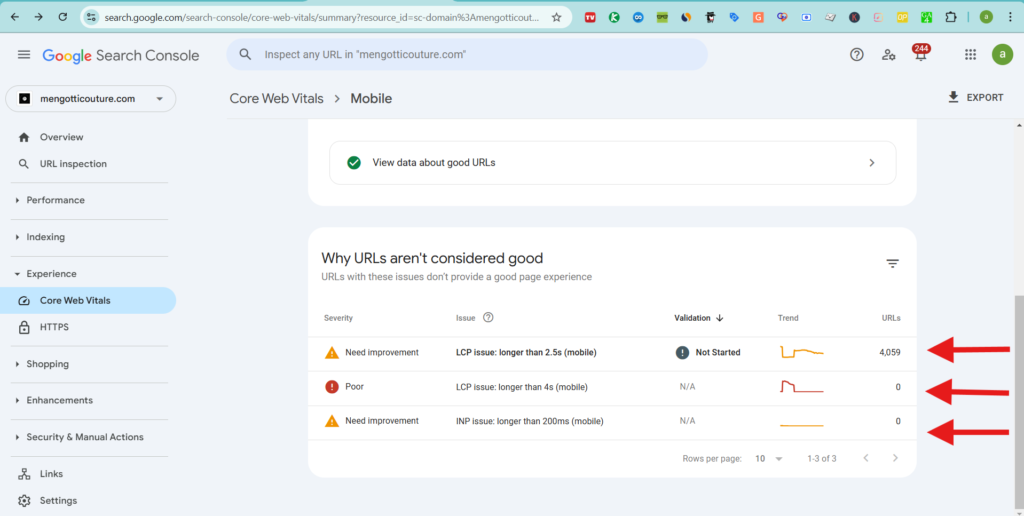
- Core Web Vitals:
- Navigate: Google Search Console > Experience > Core Web Vitals.
- Issue: Check the Core Web Vitals report for “Poor URLs” and “URLs needing improvement” for both Mobile and Desktop. Identify URLs failing Core Web Vitals metrics (LCP, FID, CLS).

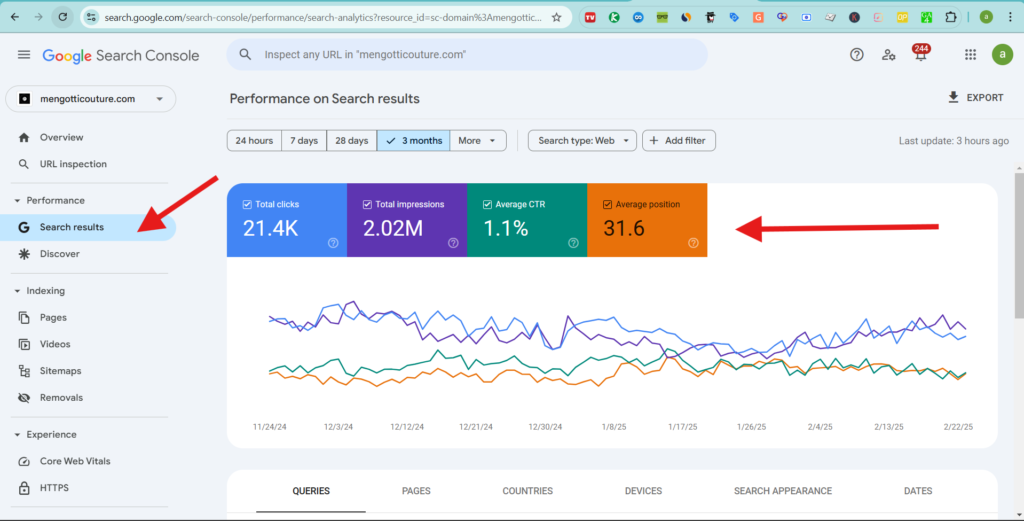
- Search Performance:
- Navigate: Google Search Console > Performance > Search results.
- Action: Review the “Clicks,” “Impressions,” “CTR,” and “Position” metrics over time (e.g., past 3 months, 6 months).
- Issue: While primarily for monitoring, a sudden and significant drop in clicks and impressions could indicate a technical SEO issue impacting overall visibility. Investigate further if a sudden drop is observed, correlating with potential technical changes or updates on the website.
Step 4: Security Checks
4.1 Security
a. SSL Certificate Status:
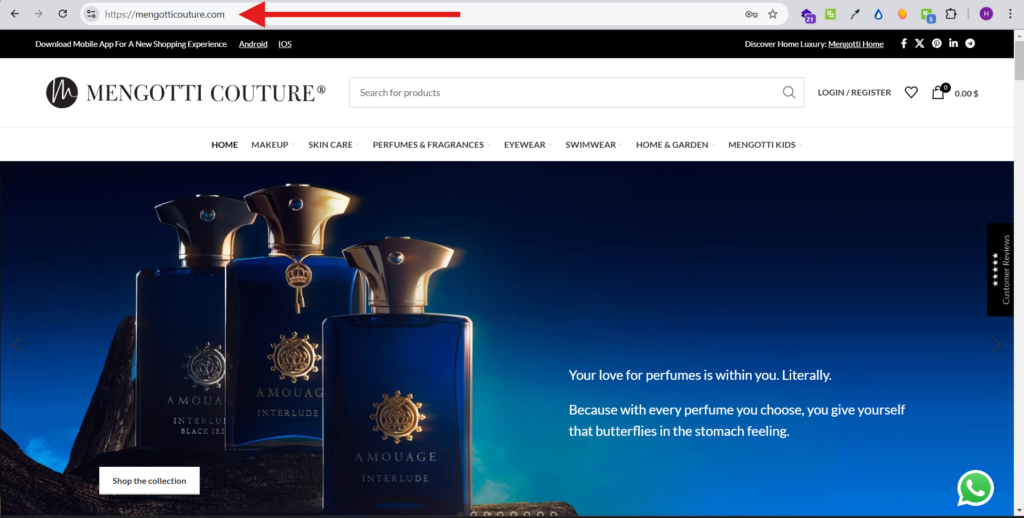
- Method 1: Browser Address Bar
- Action: Visit the website in a web browser (Chrome, Firefox, Safari, Edge).
- Action: Look at the address bar.
- Issue:
- Not Secure (HTTP): If the address bar shows “Not secure” or “http://” instead of “https://”, the website is not using SSL. This is a critical security issue.
- Secure (HTTPS with Padlock): A padlock icon and “https://” indicate a valid SSL certificate is present.
- Warning/Error Icon: If there is a warning or error icon (triangle or red padlock), click on it to see details. It may indicate issues like:
- Mixed Content: HTTPS page loading HTTP resources (see Step 4.1.b).
- Certificate Expired or Invalid: The SSL certificate may be expired or improperly installed.
- Method 2: SSL Checker Tool (https://ultahost.com/ssl-checker)
- Tool: Ultahost SSL Checker.
- Action: Enter the website’s domain name into the SSL checker tool.
- Action: Run the SSL check.
- Issue: Identify if the SSL certificate is invalid, expired, self-signed, or improperly installed. The tool should provide details on any SSL certificate issues.
b. Malware Checks:
- Use Sucuri SiteCheck (https://sitecheck.sucuri.net/)
- Action: Enter the website’s domain name into Sucuri SiteCheck.
- Action: Run the security scan.
- Issue: Identify any malware detections, website blacklisting status, or security warnings reported by Sucuri SiteCheck.
Step 5: Deeper On-Page & Content Element Checks
5.1 Deeper Dive into Crawled Data (from Step 1.1)
a. Tool: Analyze the exported crawl data from Screaming Frog (from Step 1.1). Use spreadsheet software (Excel, Google Sheets) to filter and sort the data.
- Title Tags (Missing, Duplicate, Length – Detailed Analysis):
- Meta Descriptions (Missing, Duplicate, Length – Detailed Analysis):
- H1-H6 Hierarchy and Duplicates (Detailed Analysis):
- Missing Alt Text on Images:
- Duplicate Content:
- Internal Linking Structure Analysis:
- Image Optimization Needs (Detailed Analysis):
- Canonical Tags Implementation (Detailed Verification):
- Noindex/Nofollow Directives (Detailed Verification):
- Hreflang Implementation (Detailed Verification):
- Pagination Implementation (Detailed Verification):
- HTTP/HTTPS Mixed Content (Deeper Crawl Check):
Step 6: Mobile Responsiveness & Usability Testing
6.1 Mobile Responsiveness Issues
a. Tool 1: Google Mobile-Friendly Test (https://search.google.com/test/mobile-friendly)
- Action: Enter the website’s homepage URL and key page URLs into the Google Mobile-Friendly Test.
- Action: Run the test for each URL.
- Issue: Identify pages that are not mobile-friendly (“Page is not mobile-friendly” result). Review specific issues reported by the test (e.g., text too small to read, viewport not configured, touch elements too close).
b. Tool 2: Google Search Console Mobile Usability Report (from Step 3.1.a.iii)
- Action: Re-verify the Mobile Usability report in Google Search Console for a broader view of mobile usability issues across the website.
- Issue: Corroborate findings from the Mobile-Friendly Test and review the GSC report for a comprehensive list of mobile usability errors affecting multiple pages.
Step 7: Advanced Technical SEO Checks
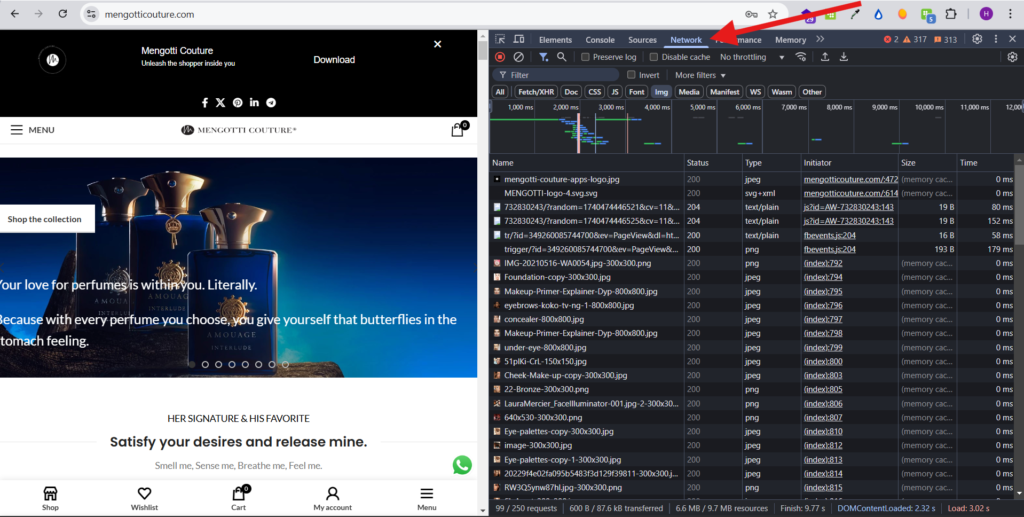
7.1 JavaScript Rendering Issues
a. Tool : Browser Developer Tools (Network Tab – Resource Loading)
- Action: Open browser developer tools (Inspect > Network). Reload the page.
- Action: Analyze the “Network” tab to see if all necessary resources (JavaScript files, CSS, images, data) are loading successfully and without errors.
- Issue: Identify any failed resource requests (4xx or 5xx errors for JavaScript or other essential files). Failed JavaScript resources can prevent proper rendering.
7.2 Structured Data Errors
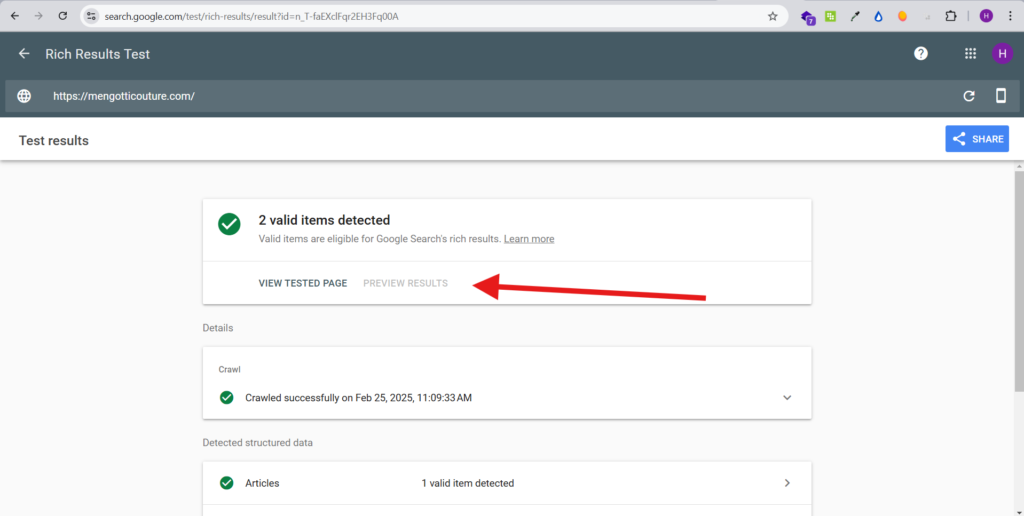
a. Tool 1: Google Rich Results Test (https://search.google.com/test/rich-results)
- Action: Enter key page URLs (especially pages intended to display rich results like product pages, articles, recipes, FAQs) into the Rich Results Test.
- Action: Run the test for each URL.
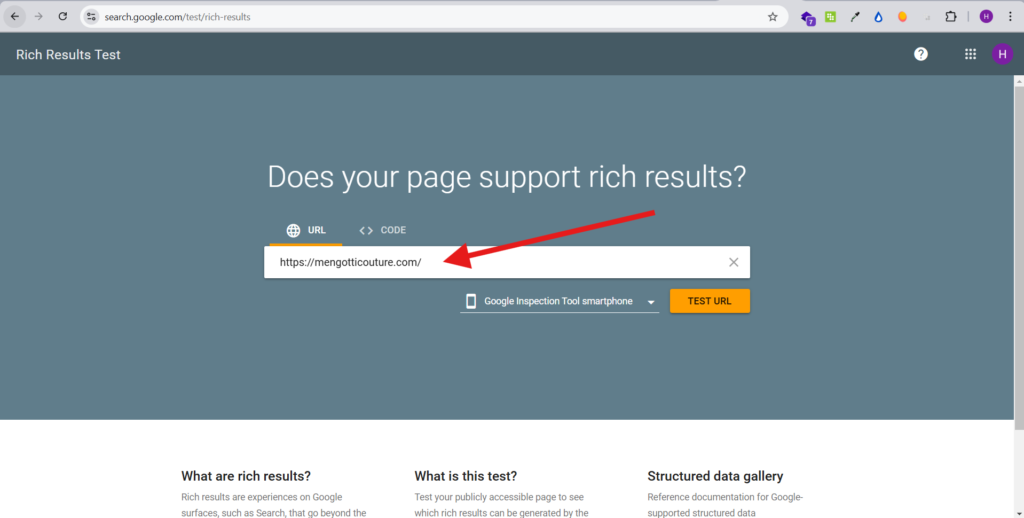
- Issue: Identify “Errors” reported by the Rich Results Test. Errors indicate invalid structured data markup that will prevent rich results from appearing in search results. Warnings should also be reviewed and addressed if possible for optimal rich result display.
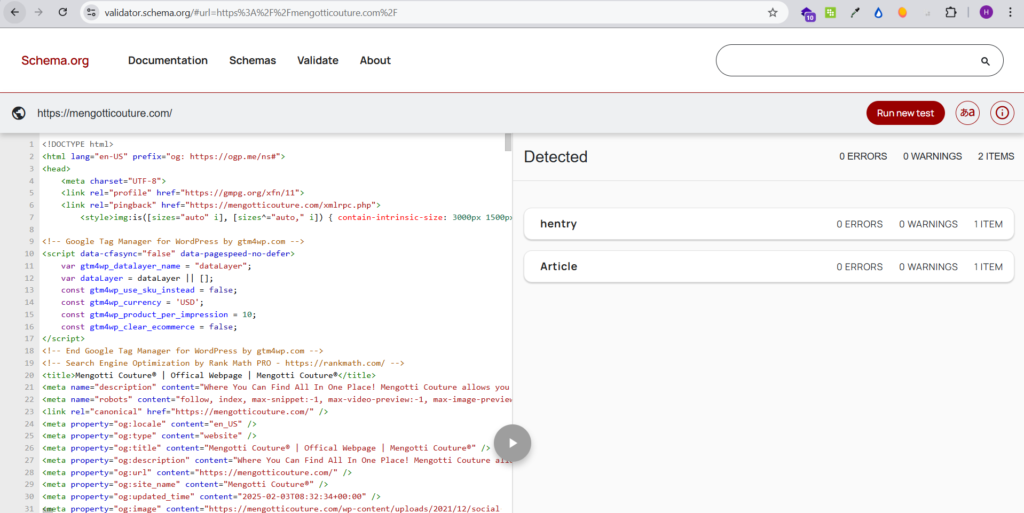
b. Tool 2: Schema Markup Validator (https://validator.schema.org/)
- Action: Enter the website’s URL or paste HTML code into the Schema Markup Validator.
- Action: Run the validation.
- Issue: Identify errors and warnings reported by the Schema Markup Validator. This tool provides more detailed validation of schema.org markup and may catch errors not detected by the Rich Results Test.
c. Method 3: Analyze Crawl Data (from Step 1.1 & 5.1)
- Action: Review the Screaming Frog crawl data. Look for any reported schema errors or warnings.
- Action: If using a different crawler with structured data extraction capabilities, analyze the extracted data for errors.
- Issue: Corroborate findings from validation tools and identify structured data errors across multiple pages from crawl data.
Step 8: Analytics & Development Environment Verification
8.1 Analytics Setup
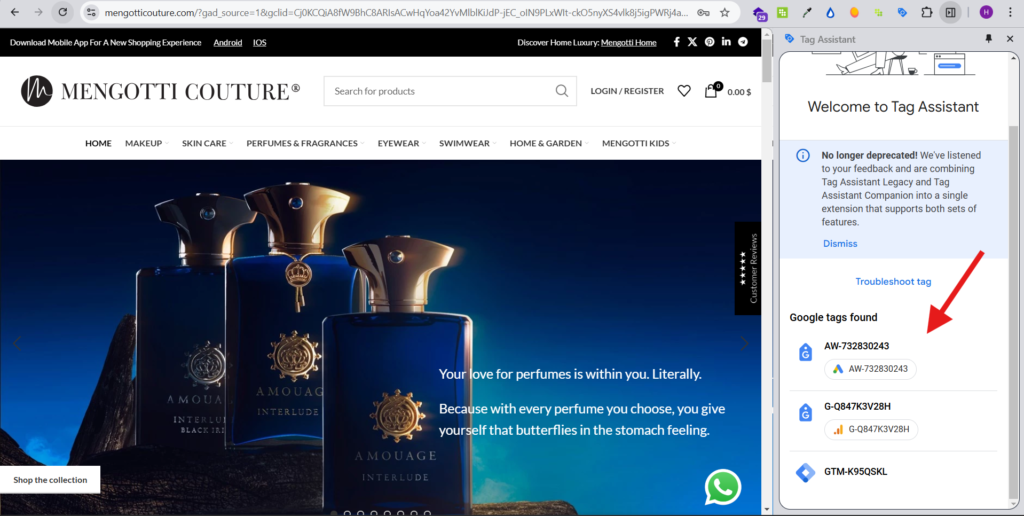
a. Tool 1: Google Tag Assistant (Chrome Extension)
- Action: Install and enable the Google Tag Assistant Chrome extension (https://tagassistant.google.com/).
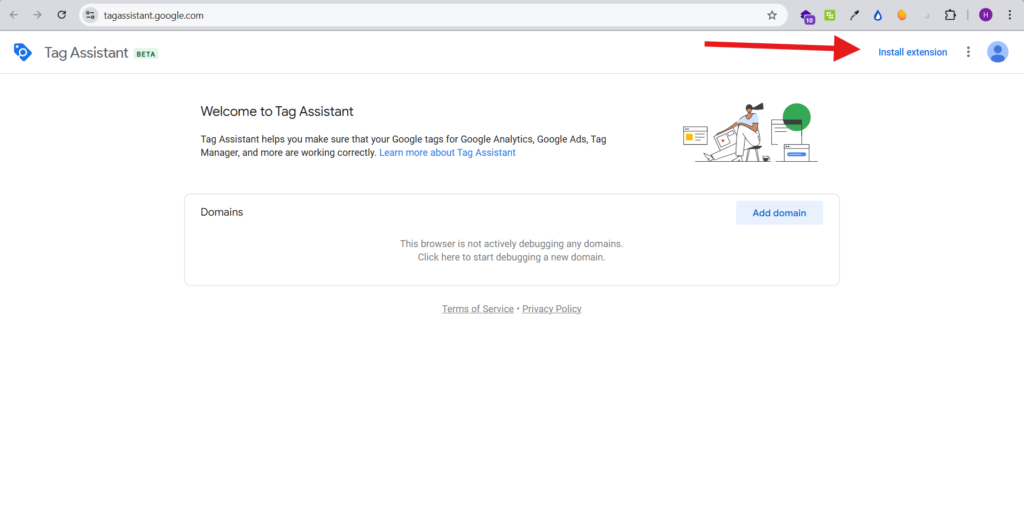
- Action: Browse the website with Tag Assistant enabled.
- Action: Check if Google Analytics tag is detected and marked as “green” (correctly implemented) or “yellow” (minor issues) or “red” (major issues/missing).
- Issue: Identify missing Google Analytics tags, incorrect tag implementation, or errors reported by Tag Assistant.
b. Method 2: Inspect Source Code
- Action: View the page source code of the website (right-click > “View Page Source”).
- Action: Search for “Google Analytics” or “UA-” or “G-” (for GA4).
- Action: Verify that the Google Analytics tracking code snippet is present within the <head> section of the HTML on key pages.
- Issue: Identify missing Google Analytics tracking code in the page source.
8.2 Development Environment Verification
a. Action: Coordinate with the development team to confirm the existence and configuration of a staging environment.
b. Verify Staging Environment Existence:
- Action: Obtain the URL for the staging environment from the development team (e.g., staging.example.com, dev.example.com).
- Issue: If no staging environment exists, document this as a recommended best practice for safe website development and updates.
c. Check Staging Environment Access Protocols:
- Action: Access the staging environment URL in a browser.
- Action: Verify if it is served over HTTPS (recommended) or HTTP.
- Issue: If staging is not served over HTTPS, recommend implementing HTTPS for staging as well, to mirror production environment.
d. Verify Staging is Password Protected:
- Action: Attempt to access the staging environment URL.
- Action: Confirm that it requires login credentials (username and password) to access.
- Issue: If the staging environment is publicly accessible without password protection, document this as a security risk.
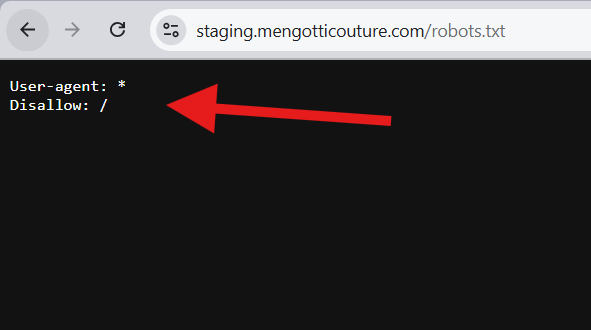
e. Confirm Staging is Blocked from Search Engines:
- Action: Access [staging environment URL]/robots.txt in a browser.
- Action: Verify that the robots.txt file contains User-agent: * and Disallow: / to block all search engine crawlers.
- Action: Inspect the <head> section of staging pages’ HTML source code. Verify that <meta name=”robots” content=”noindex, nofollow”> tag is present to further prevent indexing.
- Issue: If staging environment is not blocked from search engines via robots.txt and noindex meta tag, document this as a critical issue to prevent accidental indexing of staging content.
f. Check if Staging URLs Differ from Production:
- Action: Compare URLs of pages in the staging environment to corresponding pages in the production (live) environment.
- Action: Verify that staging URLs use a distinct subdomain (e.g., staging.domain.com vs. www.example.com) or a different domain altogether to avoid URL conflicts and confusion.
- Issue: If staging URLs are identical to production URLs, document this as a highly problematic setup that can lead to accidental overwriting of production data.
g. Verify Staging Database is Separate from Production:
- Action: Coordinate with the development team to confirm that the staging environment uses a separate database from the production database.
- Issue: If the staging environment shares the production database, document this as a critical risk. Any changes or tests in staging could directly affect live production data. Staging must have its own isolated database.
h. Check Staging SSL Configuration:
- Action: If staging is served over HTTPS, check the SSL certificate status (similar to Step 4.1.a) using browser address bar or an SSL checker tool.
- Issue: If staging SSL certificate is invalid or missing when HTTPS is used, document this. While less critical than production SSL, a valid SSL on staging is still best practice.
i. Confirm Staging Domain Naming Convention:
- Action: Review the staging domain naming convention (e.g., staging.domain.com, dev.domain.com, test.domain.com).
- Issue: If the staging domain naming convention is unclear or too similar to the production domain, document this as a potential source of confusion and errors. Recommend using a clear and consistent naming convention that easily distinguishes staging from production.
8.3 Website Backup System Verification
a. Action: Coordinate with the hosting provider or development team to verify the website’s backup system.
b. Verify Backup Frequency:
- Action: Inquire about the frequency of website backups (daily, weekly, etc.).
- Issue: If backup frequency is insufficient (e.g., only monthly or less frequent), recommend implementing daily backups (or more frequent for highly dynamic websites) to minimize data loss in case of issues.
c. Verify Backup Storage:
- Action: Inquire about where backups are stored (on-server, off-site, cloud storage).
- Issue: If backups are stored only on the same server as the website, document this as a risk. Backups should be stored off-site or in cloud storage (separate from the primary server) for disaster recovery purposes.
d. Verify Recovery Process:
- Action: Request documentation or information about the website recovery process from backups.
- Action: Ideally, request a test restore of the website from a recent backup in a controlled staging environment (if feasible and with proper authorization).
- Issue: If there is no documented recovery process, or if the recovery process is untested or unclear, document this as a critical gap in disaster recovery planning. Recommend documenting and testing the recovery process.
Step 9: Website Speed and Performance Audit
9.1 Page Load Speed Analysis:
Tools:
- Google PageSpeed Insights (https://pagespeed.web.dev/)
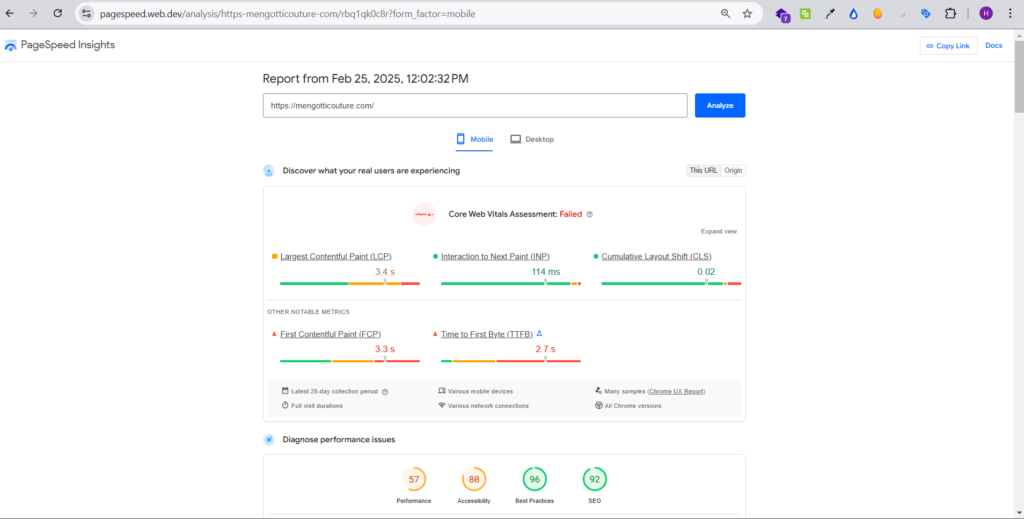
- GTmetrix (https://gtmetrix.com/)
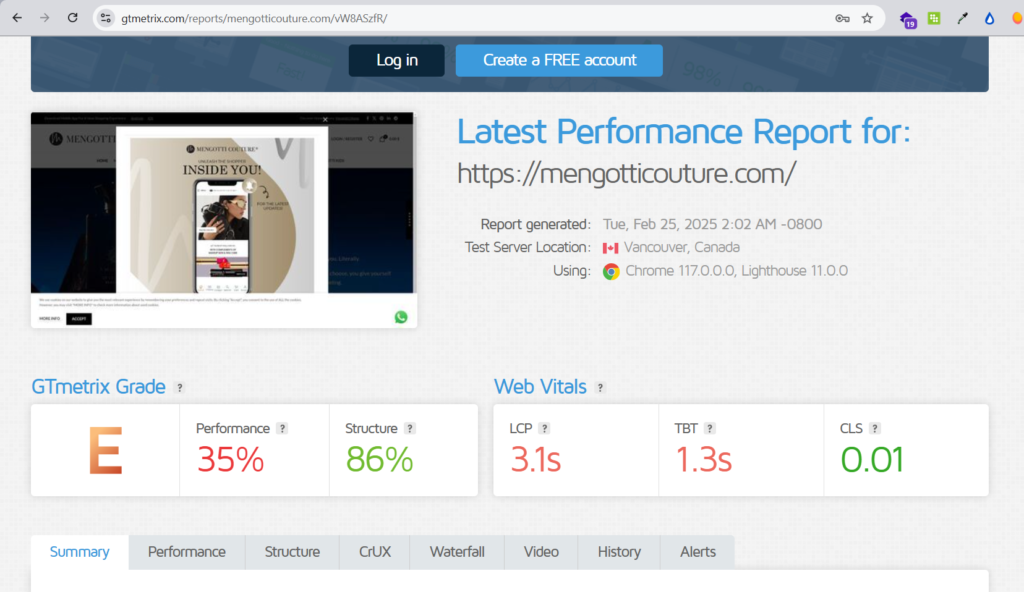
Goal: Get detailed metrics on page load speed and identify performance bottlenecks for both desktop and mobile.
Issues to Identify :
- Slow Page Load Time: Identify pages with slow load times exceeding recommended thresholds (e.g., above 3 seconds for initial load, though target depends on industry and page type).
- Poor Performance Grades: Review performance scores and grades provided by speed testing tools (PageSpeed Insights score, GTmetrix Performance Score, WebPageTest grades) and identify areas for improvement.
9.2 Core Web Vitals Assessment (Detailed):
Tool:Google Search Console Core Web Vitals report.
Goal: Evaluate Core Web Vitals metrics (LCP, FID, CLS) to assess user experience and identify pages with poor scores.
Issues to Identify :
- Poor LCP (Largest Contentful Paint): Identify pages with LCP values exceeding 2.5 seconds (Poor threshold). Aim for “Good” LCP (under 2.5s) or “Needs Improvement” (2.5s – 4s).
- Poor FID (First Input Delay): Identify pages with FID values exceeding 100 milliseconds (Poor threshold). Aim for “Good” FID (under 100ms) or “Needs Improvement” (100ms – 300ms).
- Poor CLS (Cumulative Layout Shift): Identify pages with CLS values exceeding 0.1 (Poor threshold). Aim for “Good” CLS (under 0.1) or “Needs Improvement” (0.1 – 0.25).
9.3 Resource Loading Optimization:
Tool: Google PageSpeed Insights, GTmetrix, WebPageTest, Browser Lighthouse Developer Tools (Network tab).
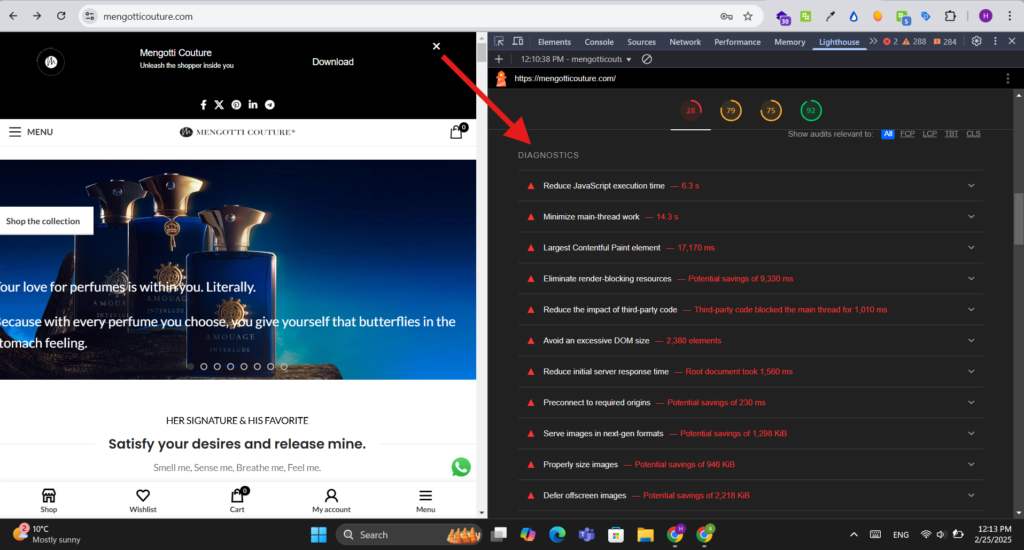
Goal: Analyze how resources (images, CSS, JavaScript, fonts, etc.) are loaded and identify optimization opportunities.
Issues to Identify :
- Unoptimized Images: Identify large image file sizes, incorrect image formats, missing or ineffective image compression.
- Blocking Resources: Identify CSS and JavaScript resources that are render-blocking and delaying page rendering.
- Unminified CSS and JavaScript: Check if CSS and JavaScript files are minified (compressed) to reduce file sizes.
- Inefficient Caching of Static Assets: Identify missing or ineffective browser caching for static assets (images, CSS, JavaScript, fonts).
- Slow Loading Third-Party Resources: Identify slow-loading or inefficient third-party scripts (ads, analytics, social media embeds) that are impacting page speed.
Quality Assurance & Verification
To ensure the quality and accuracy of the Technical SEO Audit process, the following verification steps are in place:
- Review of Audit Report: The Technical SEO Specialist will compile all findings, issues, and recommendations into a Technical SEO Audit Report using the designated template (See Section 7). This report will be reviewed by the Department Manager.
- Data Validation: The Department Manager may randomly select a subset of identified issues and request the Technical SEO Specialist to re-verify the data and findings to ensure accuracy.
- Tool Calibration: Periodically (e.g., every 6 months), the tools used in this SOP (Screaming Frog, PageSpeed Insights, etc.) will be reviewed to ensure they are up-to-date and configured correctly for optimal performance.
Error and Exception Handling:
- Critical Issues: If a critical technical SEO issue is identified (e.g., security vulnerability, website de-indexing, major crawlability problem), it must be immediately escalated to the Department Manager and relevant teams (e.g., Development, Security) for urgent remediation. Document the escalation and resolution process in the audit report.
- Tool Malfunctions: If any of the tools specified in this SOP malfunction or provide inconsistent results, the Technical SEO Specialist should attempt to troubleshoot the tool or use alternative tools if available. If the issue persists, report it to the Department Manager.
Supporting Documents / References
- Technical SEO Audit Report Template: [Link to or file path of the Technical SEO Audit Report Template – e.g., Google Docs Template, Shared Drive File Path] – Example: [Internal Company Shared Drive] > Templates > SEO > Technical SEO Audit Report Template.docx
External Web References
- Google Search Central – SEO Starter Guide: https://developers.google.com/search/docs/starter-guide – Official Google documentation on SEO fundamentals.
- Moz – Technical SEO Checklist: https://moz.com/learn/seo/technical-seo-checklist – Comprehensive technical SEO checklist from a reputable SEO resource.
- SEMrush – Technical SEO Audit Guide: https://www.semrush.com/blog/technical-seo-audit/ – Detailed guide on performing a technical SEO audit using SEMrush tools (but concepts are broadly applicable).
- Ahrefs – Technical SEO: https://ahrefs.com/blog/technical-seo/ – Collection of articles and resources on various technical SEO topics from Ahrefs.
Web.dev – Learn Web Performance: https://web.dev/learn/performance/ – Google’s resource on website performance optimization, relevant to server response time, browser caching, and page speed.